| [version en cours de rédaction] | [version en cours de rédaction] |
(Page créée avec « {{Tuto Details |Main_Picture=VSM_Welder_After_Welding_Options_VSM-P-hero.jpg |Main_Picture_annotation={"version":"2.4.6","objects":[{"type":"image","version":"2.4.6","orig... ») |
|||
| (Une révision intermédiaire par le même utilisateur non affichée) | |||
| Ligne 15 : | Ligne 15 : | ||
{{EPI}} | {{EPI}} | ||
{{Tuto Step | {{Tuto Step | ||
| − | |Step_Title=<translate> | + | |Step_Title=<translate>Setup the directory for the welder files</translate> |
| − | |Step_Content=<translate></translate> | + | |Step_Content=<translate>There is a "Read Data" button on the welding page for loading current batch. |
| + | |||
| + | This also allows you to change the file path</translate> | ||
| + | |Step_Picture_00=Stuertz_Welder_-_Setting_Barcode_Reader_Screenshot_2022-09-28_152703.jpg | ||
| + | |Step_Picture_00_annotation={"version":"2.4.6","objects":[{"type":"image","version":"2.4.6","originX":"left","originY":"top","left":0,"top":0,"width":2103,"height":1390,"fill":"rgb(0,0,0)","stroke":null,"strokeWidth":0,"strokeDashArray":null,"strokeLineCap":"butt","strokeDashOffset":0,"strokeLineJoin":"miter","strokeMiterLimit":4,"scaleX":0.29,"scaleY":0.29,"angle":0,"flipX":false,"flipY":false,"opacity":1,"shadow":null,"visible":true,"clipTo":null,"backgroundColor":"","fillRule":"nonzero","paintFirst":"fill","globalCompositeOperation":"source-over","transformMatrix":null,"skewX":0,"skewY":0,"crossOrigin":"","cropX":0,"cropY":0,"src":"https://stuga.dokit.app/images/5/59/Stuertz_Welder_-_Setting_Barcode_Reader_Screenshot_2022-09-28_152703.jpg","filters":[]},{"type":"wfrect","version":"2.4.6","originX":"center","originY":"center","left":549.96,"top":388.18,"width":78.72,"height":17.09,"fill":"rgba(255,0,0,0)","stroke":"#FF0000","strokeWidth":2,"strokeDashArray":null,"strokeLineCap":"butt","strokeDashOffset":0,"strokeLineJoin":"miter","strokeMiterLimit":4,"scaleX":1,"scaleY":1,"angle":0,"flipX":false,"flipY":false,"opacity":1,"shadow":null,"visible":true,"clipTo":null,"backgroundColor":"","fillRule":"nonzero","paintFirst":"fill","globalCompositeOperation":"source-over","transformMatrix":null,"skewX":0,"skewY":0,"rx":0,"ry":0}],"height":397,"width":600} | ||
| + | |Step_Picture_01=Stuertz_Welder_-_Setting_Barcode_Reader_Screenshot_2022-09-28_152719.jpg | ||
| + | |Step_Picture_01_annotation={"version":"2.4.6","objects":[{"type":"image","version":"2.4.6","originX":"left","originY":"top","left":0,"top":0,"width":2566,"height":1477,"fill":"rgb(0,0,0)","stroke":null,"strokeWidth":0,"strokeDashArray":null,"strokeLineCap":"butt","strokeDashOffset":0,"strokeLineJoin":"miter","strokeMiterLimit":4,"scaleX":0.23,"scaleY":0.23,"angle":0,"flipX":false,"flipY":false,"opacity":1,"shadow":null,"visible":true,"clipTo":null,"backgroundColor":"","fillRule":"nonzero","paintFirst":"fill","globalCompositeOperation":"source-over","transformMatrix":null,"skewX":0,"skewY":0,"crossOrigin":"","cropX":0,"cropY":0,"src":"https://stuga.dokit.app/images/9/9e/Stuertz_Welder_-_Setting_Barcode_Reader_Screenshot_2022-09-28_152719.jpg","filters":[]},{"type":"wfrect","version":"2.4.6","originX":"center","originY":"center","left":308.53,"top":69.81,"width":205.6,"height":91.76,"fill":"rgba(255,0,0,0)","stroke":"#FF0000","strokeWidth":2,"strokeDashArray":null,"strokeLineCap":"butt","strokeDashOffset":0,"strokeLineJoin":"miter","strokeMiterLimit":4,"scaleX":1,"scaleY":1,"angle":0,"flipX":false,"flipY":false,"opacity":1,"shadow":null,"visible":true,"clipTo":null,"backgroundColor":"","fillRule":"nonzero","paintFirst":"fill","globalCompositeOperation":"source-over","transformMatrix":null,"skewX":0,"skewY":0,"rx":0,"ry":0}],"height":345,"width":600} | ||
| + | }} | ||
| + | {{Tuto Step | ||
| + | |Step_Title=<translate>Exit the HMI</translate> | ||
| + | |Step_Content=<translate>To go to windows desktop</translate> | ||
}} | }} | ||
{{Tuto Step | {{Tuto Step | ||
|Step_Title=<translate>Install Software to emulate COM port</translate> | |Step_Title=<translate>Install Software to emulate COM port</translate> | ||
|Step_Content=<translate>If this is a Zebra scanner, the Zebra CDC scanner program will be installed already. | |Step_Content=<translate>If this is a Zebra scanner, the Zebra CDC scanner program will be installed already. | ||
| + | |||
| + | https://www.zebra.com/content/servlet/supportdownload/downloadManager?dlp=/content/dam/support-dam/en/driver/unrestricted/0002/Zebra_CDC_Driver_(x64)_v2.15.6000.exe&c=us&l=en&pagePath=/content/zebra1/us/en/support-downloads/scanners/general-purpose-scanners/li4278 | ||
For other manufacturers, this may need to be downloaded from the internet | For other manufacturers, this may need to be downloaded from the internet | ||
| Ligne 44 : | Ligne 56 : | ||
or see the barcode at [https://supportcommunity.zebra.com/s/article/Emulating-a-COM-Serial-Port-Over-USB-using-CDC-driver?language=en_US this address]</translate> | or see the barcode at [https://supportcommunity.zebra.com/s/article/Emulating-a-COM-Serial-Port-Over-USB-using-CDC-driver?language=en_US this address]</translate> | ||
|Step_Picture_00=Stuertz_Welder_-_Setting_Barcode_Reader_Screenshot_2022-09-28_151142.jpg | |Step_Picture_00=Stuertz_Welder_-_Setting_Barcode_Reader_Screenshot_2022-09-28_151142.jpg | ||
| + | }} | ||
| + | {{Tuto Step | ||
| + | |Step_Title=<translate>Log in HMI as Software</translate> | ||
| + | |Step_Content=<translate>Run HMI | ||
| + | |||
| + | The password in in g:\IT Department\Sturtz Machinery Passwords.txt | ||
| + | |||
| + | {{Warning|...This is a high level security password and should not be distributed beyond commissioning engineers}}<br /></translate> | ||
}} | }} | ||
{{Tuto Step | {{Tuto Step | ||
|Step_Title=<translate>Select COM port on HMI on the Barcode setting page</translate> | |Step_Title=<translate>Select COM port on HMI on the Barcode setting page</translate> | ||
| − | |Step_Content=<translate>Here you can also select length of string and test the barcode reader function</translate> | + | |Step_Content=<translate>Barcode settings are on the features bar on the left hand side |
| + | |||
| + | Here you can also select length of string and test the barcode reader function</translate> | ||
|Step_Picture_00=Stuertz_Welder_-_Setting_Barcode_Reader_Screenshot_2022-09-28_144256.jpg | |Step_Picture_00=Stuertz_Welder_-_Setting_Barcode_Reader_Screenshot_2022-09-28_144256.jpg | ||
|Step_Picture_00_annotation={"version":"2.4.6","objects":[{"type":"image","version":"2.4.6","originX":"left","originY":"top","left":-355,"top":14,"width":1374,"height":588,"fill":"rgb(0,0,0)","stroke":null,"strokeWidth":0,"strokeDashArray":null,"strokeLineCap":"butt","strokeDashOffset":0,"strokeLineJoin":"miter","strokeMiterLimit":4,"scaleX":0.7,"scaleY":0.7,"angle":0,"flipX":false,"flipY":false,"opacity":1,"shadow":null,"visible":true,"clipTo":null,"backgroundColor":"","fillRule":"nonzero","paintFirst":"fill","globalCompositeOperation":"source-over","transformMatrix":null,"skewX":0,"skewY":0,"crossOrigin":"","cropX":0,"cropY":0,"src":"https://stuga.dokit.app/images/b/ba/Stuertz_Welder_-_Setting_Barcode_Reader_Screenshot_2022-09-28_144256.jpg","filters":[]}],"height":450.1891551071879,"width":600} | |Step_Picture_00_annotation={"version":"2.4.6","objects":[{"type":"image","version":"2.4.6","originX":"left","originY":"top","left":-355,"top":14,"width":1374,"height":588,"fill":"rgb(0,0,0)","stroke":null,"strokeWidth":0,"strokeDashArray":null,"strokeLineCap":"butt","strokeDashOffset":0,"strokeLineJoin":"miter","strokeMiterLimit":4,"scaleX":0.7,"scaleY":0.7,"angle":0,"flipX":false,"flipY":false,"opacity":1,"shadow":null,"visible":true,"clipTo":null,"backgroundColor":"","fillRule":"nonzero","paintFirst":"fill","globalCompositeOperation":"source-over","transformMatrix":null,"skewX":0,"skewY":0,"crossOrigin":"","cropX":0,"cropY":0,"src":"https://stuga.dokit.app/images/b/ba/Stuertz_Welder_-_Setting_Barcode_Reader_Screenshot_2022-09-28_144256.jpg","filters":[]}],"height":450.1891551071879,"width":600} | ||
| − | |||
| − | |||
| − | |||
| − | |||
}} | }} | ||
{{Notes}} | {{Notes}} | ||
{{PageLang | {{PageLang | ||
| + | |Language=en | ||
|SourceLanguage=none | |SourceLanguage=none | ||
|IsTranslation=0 | |IsTranslation=0 | ||
| − | |||
}} | }} | ||
{{Tuto Status | {{Tuto Status | ||
|Complete=Draft | |Complete=Draft | ||
}} | }} | ||
Version actuelle datée du 11 juin 2025 à 17:54
Setting up a VSM barcode reader

Difficulté
Moyen
Durée
10 minute(s)
Sommaire
- 1 Introduction
- 2 Étape 1 - Setup the directory for the welder files
- 3 Étape 2 - Exit the HMI
- 4 Étape 3 - Install Software to emulate COM port
- 5 Étape 4 - Open the Device Manager to see the COM Ports
- 6 Étape 5 - Enable option to emulate COM port
- 7 Étape 6 - Log in HMI as Software
- 8 Étape 7 - Select COM port on HMI on the Barcode setting page
- 9 Commentaires
Introduction
How to set up a VSM welder and barcode reader
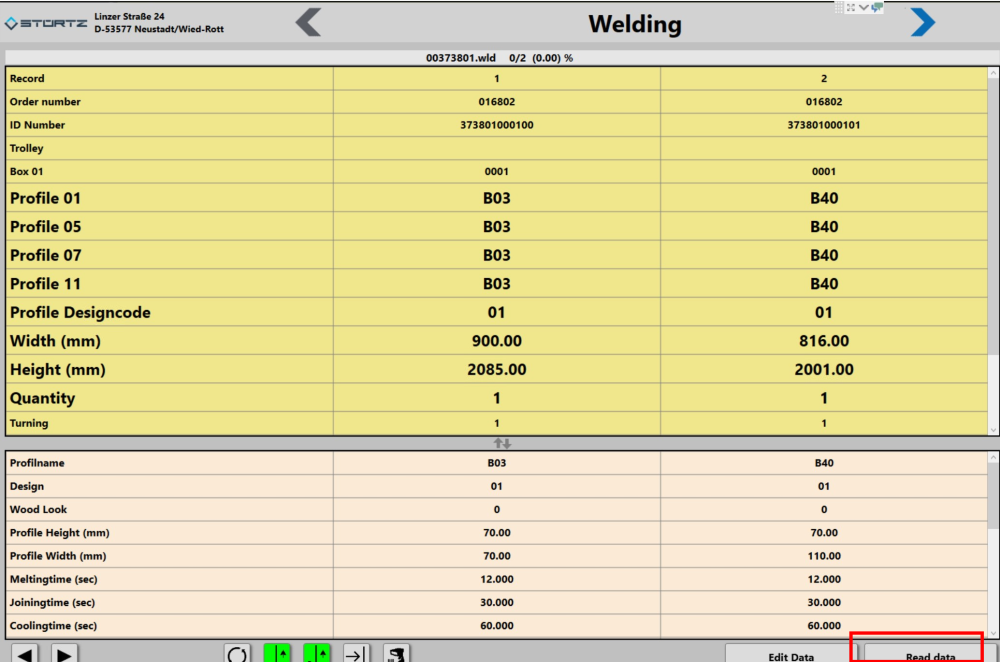
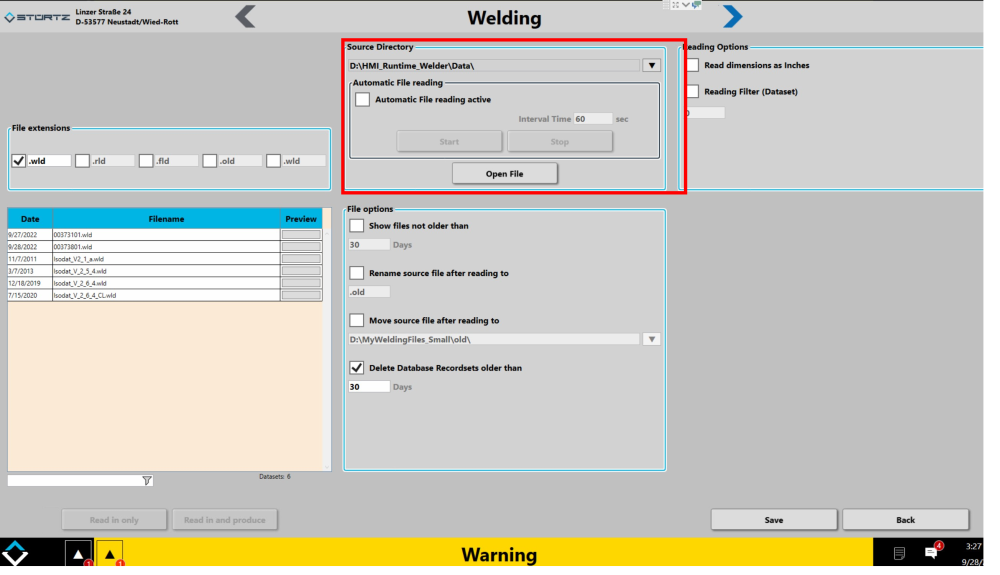
Étape 1 - Setup the directory for the welder files
There is a "Read Data" button on the welding page for loading current batch.
This also allows you to change the file path
Étape 2 - Exit the HMI
To go to windows desktop
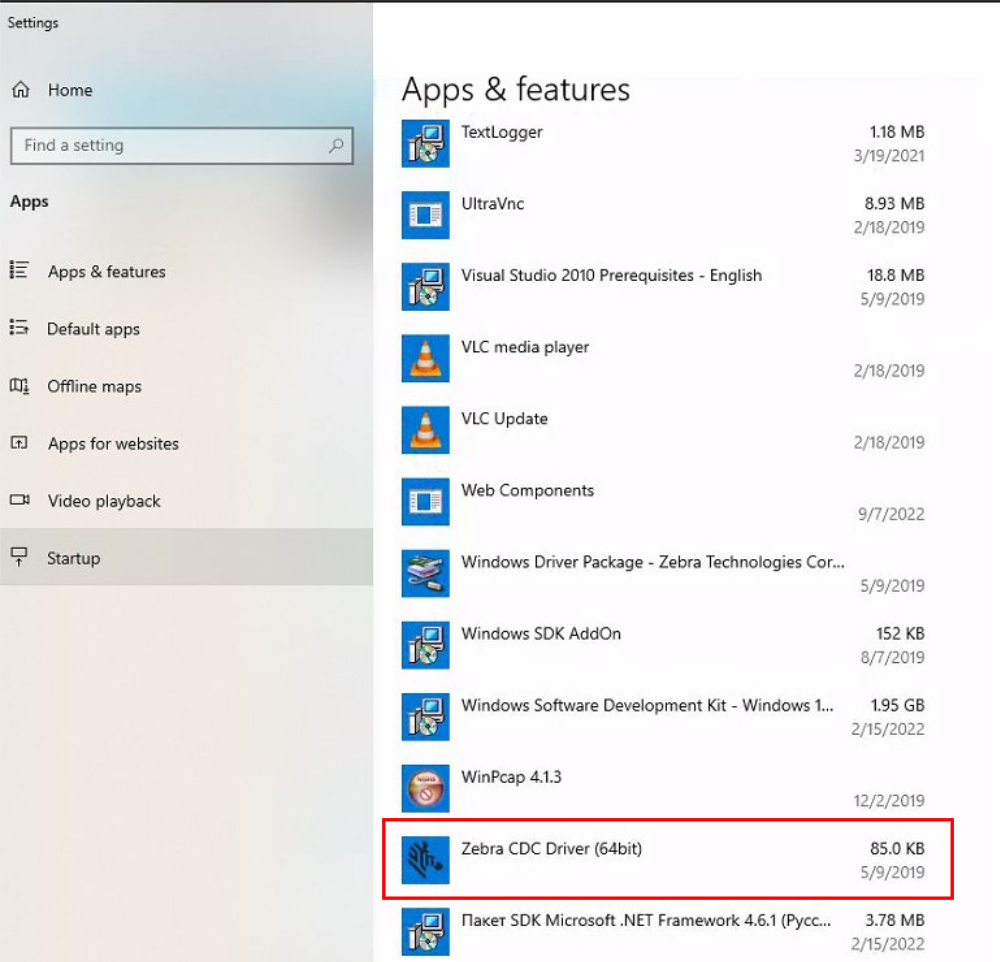
Étape 3 - Install Software to emulate COM port
If this is a Zebra scanner, the Zebra CDC scanner program will be installed already.
For other manufacturers, this may need to be downloaded from the internet
Étape 4 - Open the Device Manager to see the COM Ports
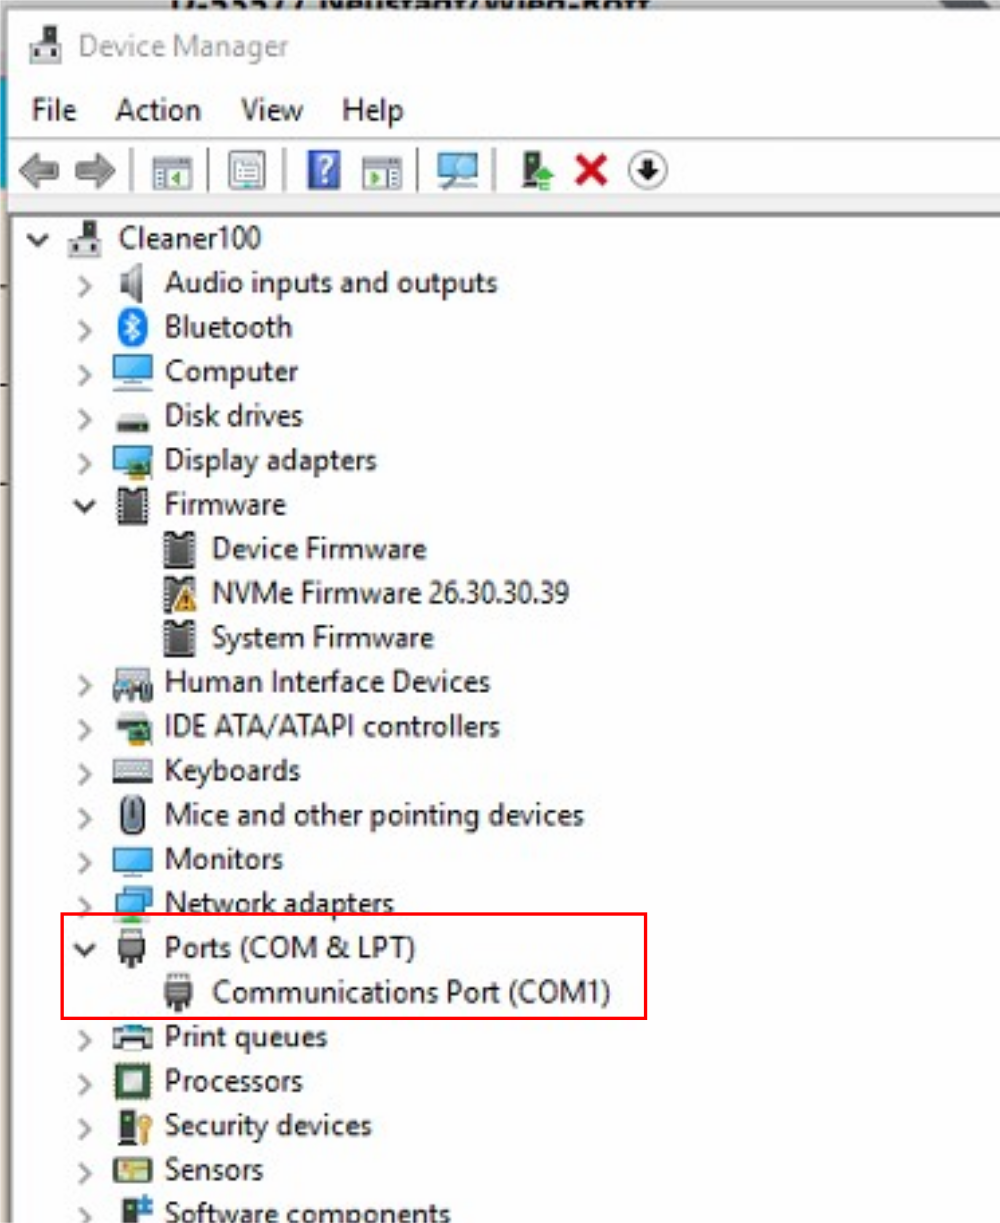
Étape 5 - Enable option to emulate COM port
For a Zebra barcode reader -
Use Reader manual to scan the barcode
or scan the barcode opposite
or see the barcode at this address

Étape 6 - Log in HMI as Software
Run HMI
The password in in g:\IT Department\Sturtz Machinery Passwords.txt
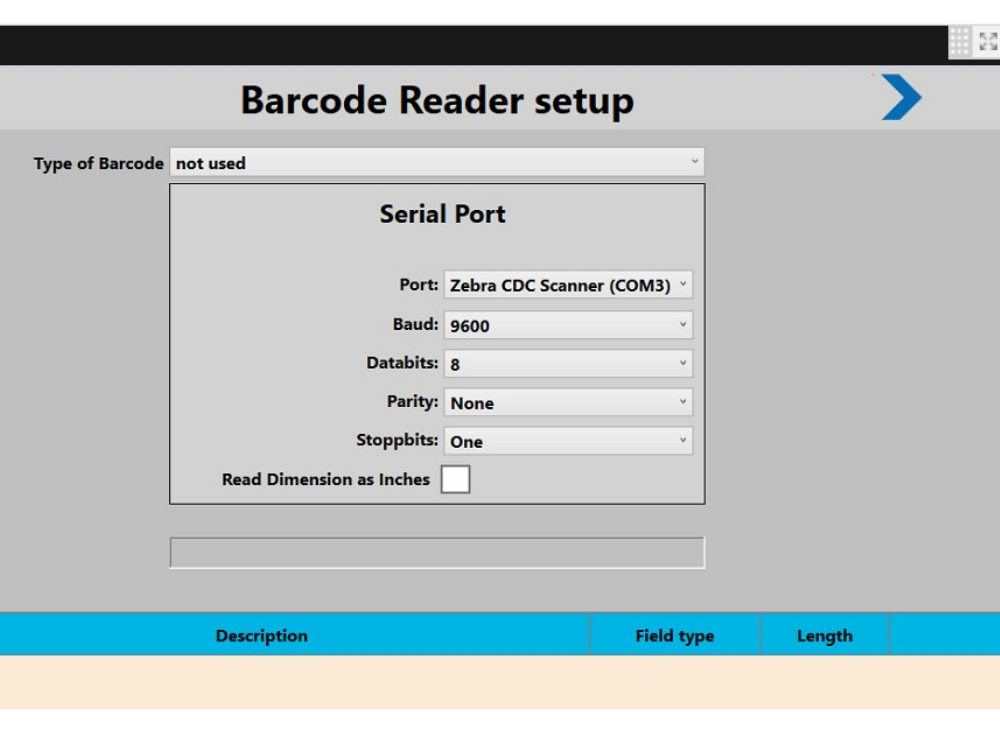
Étape 7 - Select COM port on HMI on the Barcode setting page
Barcode settings are on the features bar on the left hand side
Here you can also select length of string and test the barcode reader function
Draft
 Français
 English
 Deutsch
 Español
 Italiano
 Português