| [version en cours de rédaction] | [version en cours de rédaction] |
(Page créée avec « {{Tuto Details |Description=<translate>Instructions to prepare parts for fitting to main frame</translate> |Categories=Production |Difficulty=Medium |Duration=3 |Duration-... ») |
|||
| (3 révisions intermédiaires par le même utilisateur non affichées) | |||
| Ligne 1 : | Ligne 1 : | ||
{{Tuto Details | {{Tuto Details | ||
| + | |Main_Picture=R0015287_Bench_Assemble_Shafts__Bearings_and_Pinions_Screenshot_2023-07-14_124844.png | ||
| + | |Main_Picture_annotation={"version":"2.4.6","objects":[{"type":"image","version":"2.4.6","originX":"left","originY":"top","left":2,"top":3,"width":997,"height":748,"fill":"rgb(0,0,0)","stroke":null,"strokeWidth":0,"strokeDashArray":null,"strokeLineCap":"butt","strokeDashOffset":0,"strokeLineJoin":"miter","strokeMiterLimit":4,"scaleX":0.6,"scaleY":0.6,"angle":0,"flipX":false,"flipY":false,"opacity":1,"shadow":null,"visible":true,"clipTo":null,"backgroundColor":"","fillRule":"nonzero","paintFirst":"fill","globalCompositeOperation":"source-over","transformMatrix":null,"skewX":0,"skewY":0,"crossOrigin":"","cropX":0,"cropY":0,"src":"https://stuga.dokit.app/images/9/96/R0015287_Bench_Assemble_Shafts_Bearings_and_Pinions_Screenshot_2023-07-14_124844.png","filters":[]}],"height":450.314465408805,"width":600} | ||
|Description=<translate>Instructions to prepare parts for fitting to main frame</translate> | |Description=<translate>Instructions to prepare parts for fitting to main frame</translate> | ||
|Categories=Production | |Categories=Production | ||
|Difficulty=Medium | |Difficulty=Medium | ||
| − | |Duration= | + | |Duration=1 |
|Duration-type=hour(s) | |Duration-type=hour(s) | ||
}} | }} | ||
{{Introduction | {{Introduction | ||
| − | |Introduction=<translate></translate> | + | |Introduction=<translate>'''<u>Tools Required</u>''' |
| + | |||
| + | |||
| + | Compressed air line | ||
| + | |||
| + | 180 grit emery tape | ||
| + | |||
| + | Fe10 solvent | ||
| + | |||
| + | Cleaning cloth | ||
| + | |||
| + | Standard Hex key set | ||
| + | |||
| + | Standard spanner set | ||
| + | |||
| + | Grease gun | ||
| + | |||
| + | |||
| + | '''<u>Parts Required</u>''' | ||
| + | |||
| + | |||
| + | D0015556 x 1 | ||
| + | |||
| + | D0015555 x 1 | ||
| + | |||
| + | B0001094 x 9 | ||
| + | |||
| + | B0000228 x 9</translate> | ||
}} | }} | ||
{{Materials}} | {{Materials}} | ||
{{EPI}} | {{EPI}} | ||
{{Tuto Step | {{Tuto Step | ||
| − | |Step_Title=<translate></translate> | + | |Step_Title=<translate>Quality check</translate> |
| − | |Step_Content=<translate></translate> | + | |Step_Content=<translate>That that indicated 2 of M6 tapped holes are taped through |
| + | |||
| + | |||
| + | To check wind M6 grubscrew through hole and make sure it exits the other side | ||
| + | |||
| + | |||
| + | 9 off to check</translate> | ||
| + | |Step_Picture_00=R0015287_Bench_Assemble_Shafts__Bearings_and_Pinions_Screenshot_2023-12-11_075546.png | ||
| + | |Step_Picture_00_annotation={"version":"2.4.6","objects":[{"type":"image","version":"2.4.6","originX":"left","originY":"top","left":0,"top":0,"width":1014,"height":789,"fill":"rgb(0,0,0)","stroke":null,"strokeWidth":0,"strokeDashArray":null,"strokeLineCap":"butt","strokeDashOffset":0,"strokeLineJoin":"miter","strokeMiterLimit":4,"scaleX":0.59,"scaleY":0.59,"angle":0,"flipX":false,"flipY":false,"opacity":1,"shadow":null,"visible":true,"clipTo":null,"backgroundColor":"","fillRule":"nonzero","paintFirst":"fill","globalCompositeOperation":"source-over","transformMatrix":null,"skewX":0,"skewY":0,"crossOrigin":"","cropX":0,"cropY":0,"src":"https://stuga.dokit.app/images/2/26/R0015287_Bench_Assemble_Shafts_Bearings_and_Pinions_Screenshot_2023-12-11_075546.png","filters":[]},{"type":"wfellipse","version":"2.4.6","originX":"center","originY":"center","left":175.3,"top":147.7,"width":80.38,"height":80.38,"fill":"rgba(255,0,0,0)","stroke":"#FF0000","strokeWidth":2,"strokeDashArray":null,"strokeLineCap":"butt","strokeDashOffset":0,"strokeLineJoin":"miter","strokeMiterLimit":4,"scaleX":1,"scaleY":1,"angle":0,"flipX":false,"flipY":false,"opacity":1,"shadow":null,"visible":true,"clipTo":null,"backgroundColor":"","fillRule":"nonzero","paintFirst":"fill","globalCompositeOperation":"source-over","transformMatrix":null,"skewX":0,"skewY":0,"rx":40.190745797712054,"ry":40.190745797712054},{"type":"wfellipse","version":"2.4.6","originX":"center","originY":"center","left":201.72,"top":294.28,"width":73.39,"height":73.39,"fill":"rgba(255,0,0,0)","stroke":"#FF0000","strokeWidth":2,"strokeDashArray":null,"strokeLineCap":"butt","strokeDashOffset":0,"strokeLineJoin":"miter","strokeMiterLimit":4,"scaleX":1,"scaleY":1,"angle":0,"flipX":false,"flipY":false,"opacity":1,"shadow":null,"visible":true,"clipTo":null,"backgroundColor":"","fillRule":"nonzero","paintFirst":"fill","globalCompositeOperation":"source-over","transformMatrix":null,"skewX":0,"skewY":0,"rx":36.69682287823881,"ry":36.69682287823881}],"height":467,"width":600} | ||
}} | }} | ||
{{Tuto Step | {{Tuto Step | ||
| − | |Step_Title=<translate></translate> | + | |Step_Title=<translate>Clean shafts</translate> |
| − | |Step_Content=<translate></translate> | + | |Step_Content=<translate>Ensure shafts D0015556 and D0015555 are clean before trial fitting . |
| + | |||
| + | 1 check for any burrs or damage to shafts . Remove with File/emery tape 180 grit if present | ||
| + | |||
| + | 2 Use compressed air to clean debris from all keyways on shafts . | ||
| + | |||
| + | 3 Use Fe10 solvent to remove contaminants on | ||
| + | |||
| + | shafts</translate> | ||
| + | |Step_Picture_00=R0015287_Bench_Assemble_Shafts__Bearings_and_Pinions_Screenshot_2023-11-16_152247.png | ||
}} | }} | ||
{{Tuto Step | {{Tuto Step | ||
| − | |Step_Title=<translate></translate> | + | |Step_Title=<translate>Clean and prepare bearings</translate> |
| − | |Step_Content=<translate></translate> | + | |Step_Content=<translate>Ensure bearings B0000228 9 off are clean before trial fitting |
| + | |||
| + | 1 Check for any internal burrs especially around grubscrew point . | ||
| + | |||
| + | If present remove with emery tape 180 grit | ||
| + | |||
| + | 2 Use compressed air to remove and debris | ||
| + | |||
| + | 3 Use Fe10 solvent to remove any contamination</translate> | ||
| + | |Step_Picture_00=R0015287_Bench_Assemble_Shafts__Bearings_and_Pinions_Screenshot_2023-11-16_152348.png | ||
}} | }} | ||
{{Tuto Step | {{Tuto Step | ||
| − | |Step_Title=<translate></translate> | + | |Step_Title=<translate>Clean and prepare Pinions</translate> |
| − | |Step_Content=<translate></translate> | + | |Step_Content=<translate>Ensure B0001094 Pinions 9 off are clean before trial fitting |
| + | |||
| + | 1 Check for any internal burrs especially around grubscrew point . | ||
| + | |||
| + | If present remove with emery tape 180 grit | ||
| + | |||
| + | 2 Use compressed air to remove and debris | ||
| + | |||
| + | 3 Use Fe10 solvent to remove any contamination</translate> | ||
| + | |Step_Picture_00=R0015287_Bench_Assemble_Shafts__Bearings_and_Pinions_Screenshot_2023-11-16_152407.png | ||
}} | }} | ||
{{Tuto Step | {{Tuto Step | ||
| − | |Step_Title=<translate></translate> | + | |Step_Title=<translate>Check fitment of prepared parts.</translate> |
| − | |Step_Content=<translate></translate> | + | |Step_Content=<translate>Check the following |
| + | |||
| + | 1 Every B0000228 bearing passes freely over each shaft | ||
| + | |||
| + | 2 Every B0001094 pinion passes freely over each shaft | ||
| + | |||
| + | If tight spots are found, these steps should be followed | ||
| + | |||
| + | * If all pinions/bearings pass freely on a shaft but one is tight, polish out individual pinion to achieve correct fitment | ||
| + | * If all pinions ( Or most off) are tight , polish main shaft down with emery tape 180 to remove high spot | ||
| + | {{Warning|...When performing any adjustments using emery tape., parts must be thoroughly cleaned before trial fitting again as grit residue can caused components to bind together on assembly}}<br /></translate> | ||
}} | }} | ||
{{Tuto Step | {{Tuto Step | ||
| − | |Step_Title=<translate></translate> | + | |Step_Title=<translate>Fit grease points</translate> |
| − | |Step_Content=<translate> | + | |Step_Content=<translate>1 Attach supplied grease points and covers to B0000228 bearings (18 off) |
| − | + | ||
| − | + | 2 Use grease gun to grease bearings to aid assembly</translate> | |
| − | |||
| − | |||
| − | |||
| − | |||
| − | |||
| − | |||
| − | |||
| − | |||
| − | |||
| − | |||
| − | |||
| − | |||
| − | |||
| − | |||
}} | }} | ||
{{Notes}} | {{Notes}} | ||
{{PageLang | {{PageLang | ||
| + | |Language=en | ||
|SourceLanguage=none | |SourceLanguage=none | ||
|IsTranslation=0 | |IsTranslation=0 | ||
| − | |||
}} | }} | ||
{{Tuto Status | {{Tuto Status | ||
|Complete=Draft | |Complete=Draft | ||
}} | }} | ||
Version actuelle datée du 11 décembre 2023 à 10:00
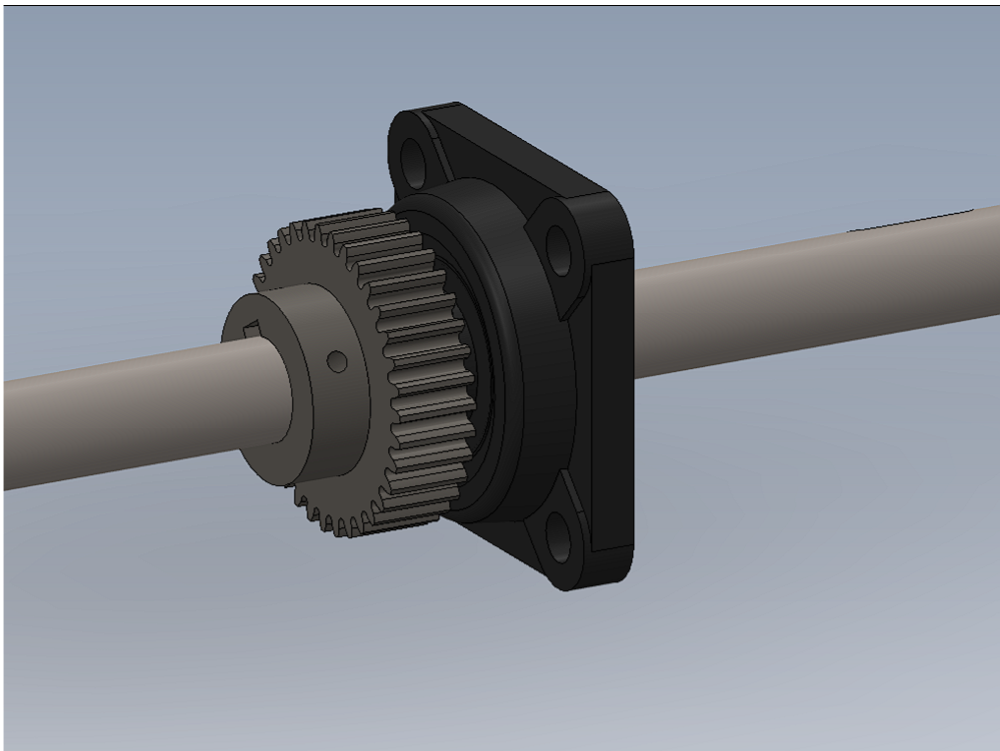
Instructions to prepare parts for fitting to main frame

Difficulté
Moyen
Durée
1 heure(s)
Introduction
Tools Required
Compressed air line
180 grit emery tape
Fe10 solvent
Cleaning cloth
Standard Hex key set
Standard spanner set
Grease gun
Parts Required
D0015556 x 1
D0015555 x 1
B0001094 x 9
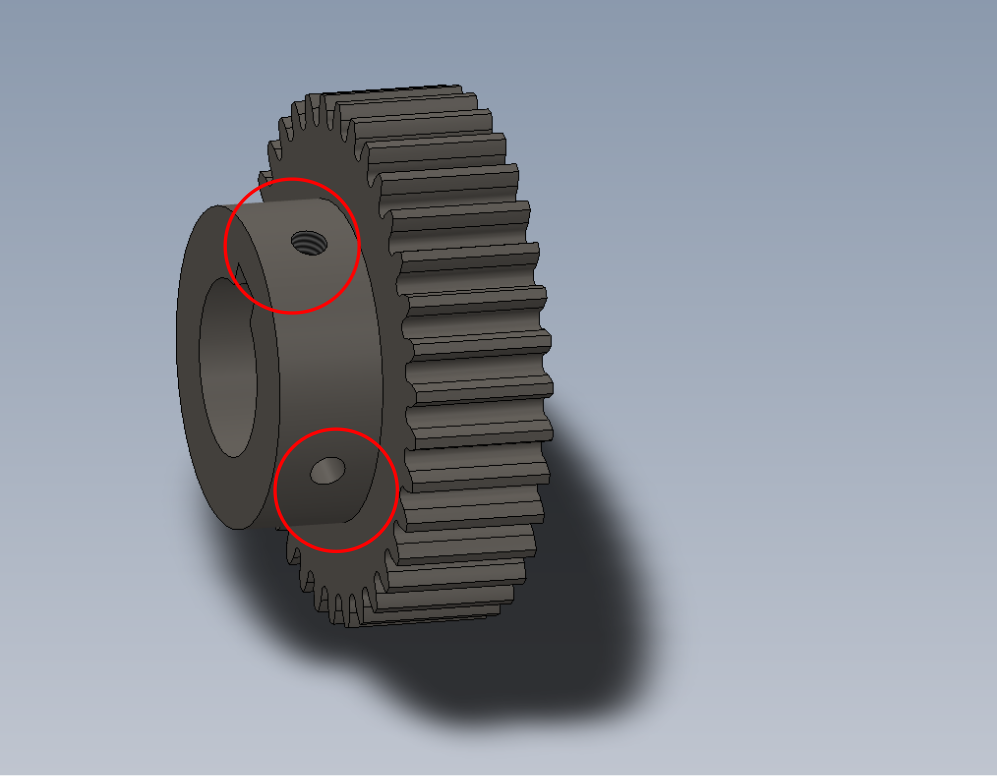
B0000228 x 9Étape 1 - Quality check
That that indicated 2 of M6 tapped holes are taped through
To check wind M6 grubscrew through hole and make sure it exits the other side
9 off to check
Étape 2 - Clean shafts
Ensure shafts D0015556 and D0015555 are clean before trial fitting .
1 check for any burrs or damage to shafts . Remove with File/emery tape 180 grit if present
2 Use compressed air to clean debris from all keyways on shafts .
3 Use Fe10 solvent to remove contaminants on
shafts

Étape 3 - Clean and prepare bearings
Ensure bearings B0000228 9 off are clean before trial fitting
1 Check for any internal burrs especially around grubscrew point .
If present remove with emery tape 180 grit
2 Use compressed air to remove and debris
3 Use Fe10 solvent to remove any contamination

Étape 4 - Clean and prepare Pinions
Ensure B0001094 Pinions 9 off are clean before trial fitting
1 Check for any internal burrs especially around grubscrew point .
If present remove with emery tape 180 grit
2 Use compressed air to remove and debris
3 Use Fe10 solvent to remove any contamination

Étape 5 - Check fitment of prepared parts.
Check the following
1 Every B0000228 bearing passes freely over each shaft
2 Every B0001094 pinion passes freely over each shaft
If tight spots are found, these steps should be followed
- If all pinions/bearings pass freely on a shaft but one is tight, polish out individual pinion to achieve correct fitment
- If all pinions ( Or most off) are tight , polish main shaft down with emery tape 180 to remove high spot
Étape 6 - Fit grease points
1 Attach supplied grease points and covers to B0000228 bearings (18 off)
2 Use grease gun to grease bearings to aid assembly
Draft
 Français
 English
 Deutsch
 Español
 Italiano
 Português