| [version en cours de rédaction] | [version en cours de rédaction] |
(Page créée avec « {{Tuto Details |Main_Picture=Troubleshoot_-_Permanent_IP_Address_-_Windows_10_windows10logo2-580x358.jpg |Main_Picture_annotation={"version":"2.4.6","objects":[{"type":"im... ») |
|||
| Ligne 7 : | Ligne 7 : | ||
|Duration=5 | |Duration=5 | ||
|Duration-type=minute(s) | |Duration-type=minute(s) | ||
| − | |Tags=Windows 10 | + | |Tags=Windows 10, IP Address |
}} | }} | ||
{{Introduction | {{Introduction | ||
| Ligne 16 : | Ligne 16 : | ||
{{Tuto Step | {{Tuto Step | ||
|Step_Title=<translate></translate> | |Step_Title=<translate></translate> | ||
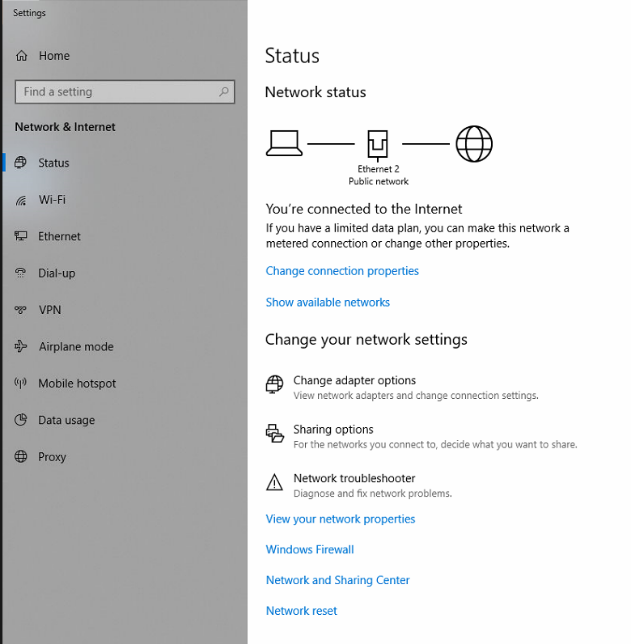
| − | |Step_Content=<translate></translate> | + | |Step_Content=<translate>Go to '''Control Panel > Network and Sharing Centre'''. |
| + | |||
| + | <br />{{Info|Alternatively you can access the Network and Sharing Centre by right clicking the network icon in the bottom right toolbar on the windows desktop.}}<br /></translate> | ||
| + | |Step_Picture_00=Troubleshoot_-_Permanent_IP_Address_-_Windows_10_Win10.png | ||
| + | |Step_Picture_00_annotation={"version":"2.4.6","objects":[{"type":"image","version":"2.4.6","originX":"left","originY":"top","left":0,"top":0,"width":826,"height":443,"fill":"rgb(0,0,0)","stroke":null,"strokeWidth":0,"strokeDashArray":null,"strokeLineCap":"butt","strokeDashOffset":0,"strokeLineJoin":"miter","strokeMiterLimit":4,"scaleX":0.73,"scaleY":0.73,"angle":0,"flipX":false,"flipY":false,"opacity":1,"shadow":null,"visible":true,"clipTo":null,"backgroundColor":"","fillRule":"nonzero","paintFirst":"fill","globalCompositeOperation":"source-over","transformMatrix":null,"skewX":0,"skewY":0,"crossOrigin":"","cropX":0,"cropY":0,"src":"https://stuga.dokit.app/images/6/6e/Troubleshoot_-_Permanent_IP_Address_-_Windows_10_Win10.png","filters":[]}],"height":322,"width":600} | ||
| + | }} | ||
| + | {{Tuto Step | ||
| + | |Step_Title=<translate></translate> | ||
| + | |Step_Content=<translate>Now go to '''Change Adaptor Settings'''</translate> | ||
| + | |Step_Picture_00=Troubleshoot_-_Permanent_IP_Address_-_Windows_10_Win101.png | ||
| + | }} | ||
| + | {{Tuto Step | ||
| + | |Step_Title=<translate></translate> | ||
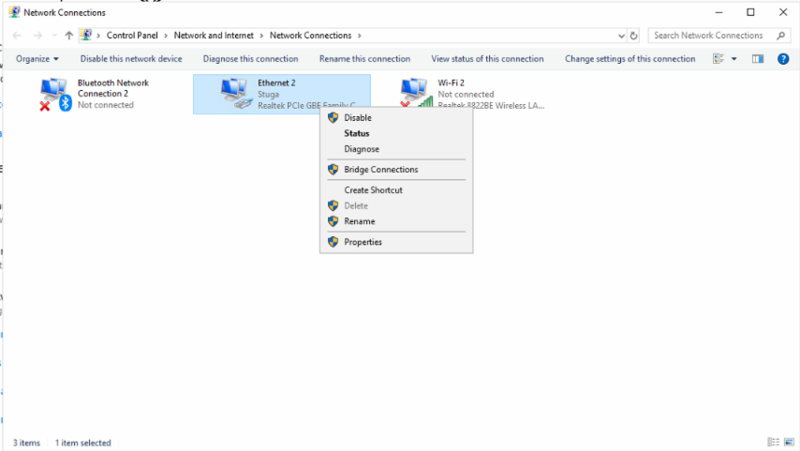
| + | |Step_Content=<translate>Go to the connected network and '''Right-Click > Properties'''</translate> | ||
| + | |Step_Picture_00=Troubleshoot_-_Permanent_IP_Address_-_Windows_10_Win102.png | ||
| + | }} | ||
| + | {{Tuto Step | ||
| + | |Step_Title=<translate></translate> | ||
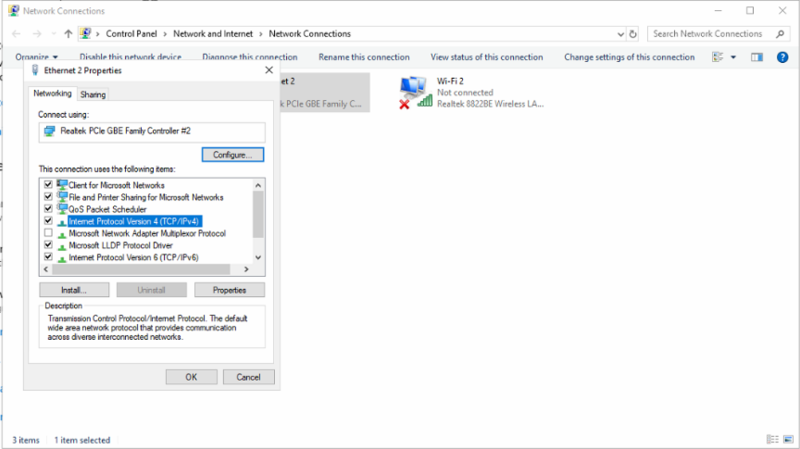
| + | |Step_Content=<translate>Scroll down to '''Internet Protocol Version 4(TCP/IPv4) '''and select. Now click '''Properties.'''</translate> | ||
| + | |Step_Picture_00=Troubleshoot_-_Permanent_IP_Address_-_Windows_10_Win103.png | ||
| + | }} | ||
| + | {{Tuto Step | ||
| + | |Step_Title=<translate></translate> | ||
| + | |Step_Content=<translate>Input the '''desired IP Address, Subnet Mask, Default Gateway, Preferred''' and '''Alternate DNS Servers.'''</translate> | ||
| + | |Step_Picture_00=Troubleshoot_-_Permanent_IP_Address_-_Windows_10_Win104.png | ||
}} | }} | ||
{{Notes}} | {{Notes}} | ||
{{PageLang | {{PageLang | ||
| + | |Language=en | ||
|SourceLanguage=none | |SourceLanguage=none | ||
|IsTranslation=0 | |IsTranslation=0 | ||
| − | |||
}} | }} | ||
{{Tuto Status | {{Tuto Status | ||
|Complete=Draft | |Complete=Draft | ||
}} | }} | ||
Version actuelle datée du 3 octobre 2019 à 12:25
How to change or create a permanent IP address on a Windows 10 PC.
Difficulté
Facile
Durée
5 minute(s)
Étape 5 -
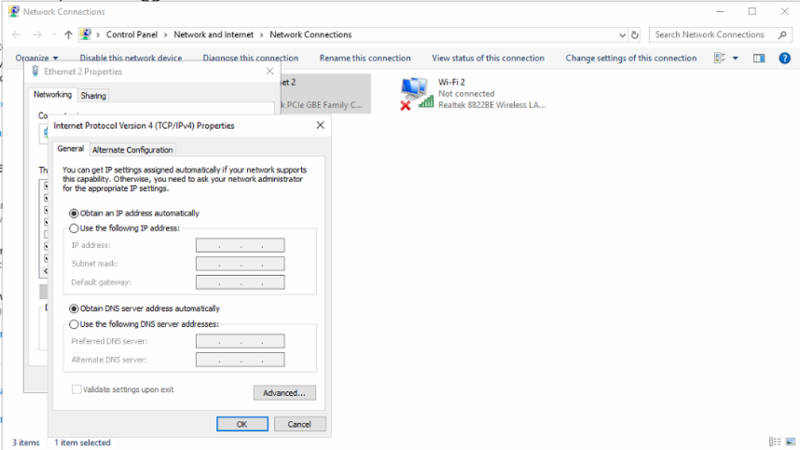
Input the desired IP Address, Subnet Mask, Default Gateway, Preferred and Alternate DNS Servers.
Draft

 Français
 English
 Deutsch
 Español
 Italiano
 Português